Showing posts with label Affinity Photo. Show all posts

Friday, October 11, 2024

BIG BOY4014 Steam Engine Locomotive and using Neo Editing and Presets

UNION PACIFIC BIG BOY 4014.  Largest Steam Locomotive in the World. 
Parked at College Station 10/8/24

 I used the Affinity Photo clone tool to carefully remove the people on the right and the cars on the left (see below).  I wanted to remove all modern-day artifacts but didn't have the time/patience to tackle the apartment complex.  I might end up doing it and updating at a later time.  Next I used Luminar Neo to edit a mystical look, dropped in a sky with a little character,  and added the preset Dirty Look.


Original.  Fujifilm XT-5 16-80 Fuji lens.


I took my daughters and one-year-old grandson to see BIG BOY at College Station. It was a clear, blue sky and the pictures were taken around high noon.  

I plan to print and frame this for the little guy.


Used the new Color Transfer edit option (tropical Landscape--match similar objects' colors) and a little Mystical edit. Also dropped in a different sky.

Friday, September 6, 2024

War Cruiser Affinity Photo and Luminar Neo Composite Photo Process


Equipment Used:  Affinity Photo 2, Luminar NEO, SketchWow, Befunky.com, and remove.bg.  Pictures were taken with a Samsung Galaxy S24 Ultra. 

This blog will focus on the process and digital programs I used to digitize the war rig and place it in some composite photos.  If you want to know how I built it, see this post:  How I Built the War Rig

PICTURES: I used a Samsung Galaxy S24 Ultra camera in photo mode.  I draped a green screen cloth over a kitchen chair with good overhead lighting.  The green screen cloth didn't work very well.  It left a green hue on shiny/reflective areas.  When I do it again, I will try a white sheet.  Setting it on a chair helped me get good angles straight on and slightly below.


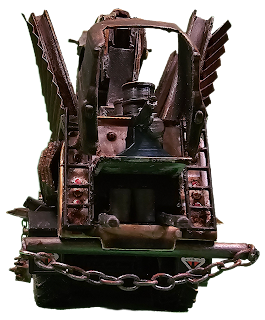
See the green hue of the green screen.  I should have used a white sheet. But setting it on a chair allowed me to get great low angles. 

I held the rig with my hand to snag a jumping perspective.

Once the pictures were taken, I used the Samsung standard picture editing software to remove the backgrounds. Using the stylus made it quick and easy. I saved each edit as a copy. The background removal did an okay job, but I had to do a lot of fine-detail finishing in Affinity Photo. Next time, I will just remove the backgrounds in Affinity Photo.  

AFFINITY PHOTO:  
I'm not a professional graphic designer.  I know just enough to give myself a big headache.  When I'm stuck, I find Youtube instructional videos.  AF was primarily used for fine-detail background removal around the perimeter of the war rig.  Using the selection brush tool only worked well some of the time. I ended up spending too much time switching between adding or removing my selection.   For the best and usually quickest results, I spent most of my time using the erase brush tool.  This is a long and tedious task.  
I also used AF to create two gaslands gang identifiers.  Here is the first one I call "The Trumpinator":
Here is what I started with:

REMOVE.BG
For small picture files my go-to for background removal is the free website remove.bg.  I have added it to my web browser tool bar at the top for quick access.  It's so good and for small/low res pictures it's the way to go.  You can pay per pic or a monthly for high resolution but I save high resolution for Affinity Photo.  So I used remove.bg to remove the Trumpinator original file and turn it into a .png file.  

BEFUNKY.COM
Then I dropped it in Befunky.com to turn it into a drawing.  Befunky.com has a minimal free offering but I use it a lot and pay about $15 a month for it.  There is a way to get good-quality pictures from it for free, and I did for a number of months, but I used it enough to earn my $$$.  If you want to know about my free workaround, ask me in the comments.  Befunky.com has an "Artsy" section in the photo editor.  I used the Sketcher GFX to turn it into a drawing.

I opened the Sketcher version in AF and using the flood selection tool, removed all the white space. I wanted the picture to be transparent except for the black lines.  This was another time-intensive endeavor.  But as they say, the devil is in the details.  I wonder if DaVinci ever got tired of painting the details in the Mona Lisa. I bet he did.  That's when you stop and take a break.  There were about 4 times I thought I was done and saved it as a png to only see I had missed a little white space here, another there.  The white space stuck out like a sore thumb, so there was no ignoring it. 

Next, I selected the hair and changed it to yellow. Then I found a metal-textured picture I liked and used remove.bg to remove the background and turn it into a .png.  That's the hair from my picture above.  When I added it to my war rig pictures I kept it transparent so it takes on the look of whatever it's placed on.  

The next thing I did was find a blood-red painted circle, bullet holes, and a blood drop and run .png that is flowing from the ear with a bullet hole next to it.  Again, I used remove.bg to quickly complete those tasks.  By now you should have a good idea why it's called the "Trumpinator". It's September 2024 and elections are in November.  Last month Trump narrowly avoided a bullet through the brain and it nicked his ear.  

But when I was finished with the Trumpinator I felt it was too detailed so I made my own gaslands gang identifier:
SKETCHWOW
To create this I used the program SketchWow that I bought a couple years ago for $50. Now if I were an AF power user I wouldn't have to use SketchWow, but I'm not. I use SketchWow at my day job to create PowerPoint graphics for presentations--that's what it does.  I love SketchWow and this was my first time using it for my gaslands hobby. Now it looks pretty basic, and it is, and I may fine-tune it in the future, but see how it looks in this picture:


LUMINAR NEO
To get it to look like it belongs I had to use Luminar NEO.  NEO is where the majic happens.  NEO is the icing.  AF is the workhorse. NEO is much more user-friendly than AF.  NEO has a lot of editing tools but its Presets are gold.  So I'll edit a picture in AF and go to NEO to add a Preset to pull it all together.  In other words, I edited the war rig in AF, found a scenario picture on Google, and used NEO to add them and make it look like the war rig belonged (not an easy task).   

In NEO I added three layers: the scenario picture, the war rig, and then the skull.  Selecting the skull layer in the Layer Properties I selected the Overlay property.  That gave it the look that it looked like it was put on the corragated metal.  Then under the Develop options I tweaked the colors and lighting. 

In the above picture I added smoke from the mufflers and sand/dust.  Again, I found the files on Google and used remove.bg to remove the background and turn them into .png files.  For the sand/dust clouds I used AF color tools to match it to the sand.  

In the above composite, I added the moon under the "Sky" option in NEO edits and used the preset Vintage Mood at 45%.  

Here's my next composite:

For this I used AF to create the shadow. I created a duplicate of the war rig and turned it black.  Then I used the smudge tool to draw the shadow.  When I added it to NEO adjusted the opacity to fit.   Then I selected the war rig layer in NEO and adjusted the lighting and colors to match the background. Next I used the Sky edit to add a sky with some character.  I saved the picture and then added the save to NEO and used the preset film vintage.  

Here is the original background picture:


I've saved the best for last:

 I used the same procedures as the previous composites.  

Final Thoughts:
I want to take some pictures to use as my own backgrounds.  
I need to take pictures of my other gaslands mods to add to these pictures.
As much time and enjoyment this hobby has given me, I need to watch some AF instructional videos to improve my skills and reduce my effort/time using it.  

If you've read this far, thank you!  Please leave a comment so we can connect.  

Sunday, September 1, 2024

Tips for Mom and Baby Outdoor Photo Shoot


NEO Dirty Look Preset Filter @ 80 percent

Original. Fuji 16-80 lens.  Autofocus. 17.7mm. f/5. No flash.  

Post Reflection Points:
--FLASH:  Using a flash for most of the pics was a winner.  Always bring backup batteries.  My flash died early and fortunately was able to repurpose some AA batteries from one of the baby's toys.  This would have been very embarrassing and unprofessional had I been paid.  
--LIGHTING:  Set up photo shoot in the evening about an hour and a half before sunset.  Perfect lighting but you can't lolligag.  Also be aware lighting is constantly decreasing ever so gradually.  Start by taking impromptu pics and easy staging pics to get your bearings.  Save your best staging for the middle of your photo shoot for best lighting. 
--SETTING:  We took the pics outdoors at a ranch and had a lot of different areas/backgrounds to choose from.  I chose the area because it had a decorative rock bed and a tree with some character in the foreground, a wooden fence in the midground, and the tree line in the background. The sky was clear and uneventful so I tried to minimize it.  We added the hay, saddle, iron wagon wheel, and a gunny sack material to set the baby down for props.  We had to clear the area of some horse manure and watch out for patches of sticky grass thorns.
--ATMOSPHERE:  It was a clear, hot, upper 90's, humid, Texas summer day. Have cold bottled waters, handkerchiefs for wiping sweat, and take short breaks. Pay attention to faces and sweat beading. 
--BABIES:  Matias, the baby, is one year old.  His mother (Georgia) and grandmother (Patti) were great at jumping and calling to get his attention to smile, hold head up, and look at the direction of the camera.  Be patient when taking toddler pics by themselves.  When he cried, which was often, I paused quickly to allow the mother to play and settle him.  I didn't want him to cry so hard as to get emotionally upset to the point of no return.  Sometimes you can avoid it, others times it is what it is. 
--EXPECTATIONS:  I shot 90 pictures and maybe had 10 that were worthy of mention.  There is maybe another 10 with potential and good for personal sharing.  A 20% return rate is exceptional in my experience.  What helped this shoot is the lighting, backdrop, and a baby that did really good considering it was really hot and humid and he was in an unfamiliar place.  Good job Matias!  Good job Georgia!


Now for some final pics to share.

Enhanced skyline.


NEO Composite. Added sky. Sepia filter.  Also created the Wanted poster using another picture, clipart of Wanted Poster, and BeFunky.com to turn it into a drawing.   


Composite.  Rocky Mountains added to sky.


NEO Dramatic and Mystical Edit


NEO Preset My Preset

NEO Preset My Preset

NEO Preset Autumn Glow

NEO Preset Instant Results

NEO Preset Warm Glow 85 percent

NEO Preset Ginger Look 50 percent


Thursday, August 29, 2024

fotoboi.com


 My wife's oldest son who was already an adult when we got married, has a daughter who is four now.  I don't get to see her as much, but when I do, it's often at birthday parties and special events and I usually have my camera in tow.  So she calls me and knows me as Photoboy.  Photography is a hobby for me but hobbies cost $$$, and photography is no exception,  It would be nice to, at the minimum, recoup my equipment expense/investments which are probably around $8-10k. And there's always a "wish list" new lens or editing tool expense on the horizon.  

So I have thought about having a website in addition to this blog but the focus would be highlighting best pics, etc...Using Squarespace.com* I searched for Photoboy.com and it was for sale for $6,000.  Pass.  But fotoboi.com** was available for $55 for a three year term!  No brainer.  Plus Squarespace has a website builder with options to upgrade marketing options. 

Using a picture I took of myself, Befunky.com, Affinity Photo, and Luminar NEO, I created a logo/brand icon.  Befunky has a variety of artistic tools that "artsify" your photos that I have used quite successfully in the past.  

As hobbies go, we'll see how far I can build out the website and brand.  Then there is specializing services offered.  The quick money is baby/family photo shoots.  I also have a connection to a Real Estate agent who might like/need pictures for her homes.  For stock photos, pay per pic, there are places like Shutterstock, adobe stock, and Wirestock.  If I were selling the farm and going all in I would be doing all of them, but alas, I am not, it is a hobby.  I have to be careful to limit my entrepreneur brain and get too involved (time/energy/money) in another project that pulls me from my sweetspot, pastoring.  

*Initially I started searching using Godaddy but they are more expensive than Squarespace.  Specifically, Godaddy charges extra for website security protection whereas Squarespace includes it. So Godaddy was going to cost $80 versus $55 for the same three year term.  

**As of the date of this post I have not created nor published photoboi.com

Tuesday, November 7, 2023

Mercury Sighted


Snapped this vintage Mercury sitting in my neighborhood while taking Abigail for a walk.  Finally I had my Fuji XT-5 and not just my camera phone.  I'm getting better at taking the extra effort to carry it, and it pays off.

I had my 16-80 mm lens, wide tracking AF mode, PROVIA/STANDARD film simulation. Did some very light removal of a couple paint chips on the hood.  I threw it in Luminar NEO and cut out the background and threw a solar/lens flare layer behind it. Also did a Neon Skyline preset.  

If you look close you can see my reflection in the front bumper!

Tuesday, July 4, 2023

Focus Merge on a Matchbox CJ-7 Jeep with the Fujifilm X-T5 Camera


This was a focus merge in Affinity Photo. I used a Fujifilm X-T5 with a 16-80mm lens zoomed in at around 50 mm (I was about 12" away)and took 12 pics focusing on different parts of the Matchbox Jeep. Focus merge combines the pics into one file and then the work begins. You have to select the sharpest pic of the area you're working on and then clone it to the master file. This process allows you to get sharp focus at various focal lengths. I found it to be very time-intensive but very rewarding. The detail is amazing. Just look at the lent(?) on top of the front tire under the wheel well. Even in the shadow the camera picked it up in fine detail. The detail also exposed the sloppy paint job! What can you expect from a $1.50 toy?


BIG BOY4014 Steam Engine Locomotive and using Neo Editing and Presets

UNION PACIFIC BIG BOY 4014.  Largest Steam Locomotive in the World.  Parked at College Station 10/8/24  I used the Affinity Photo clone tool...